Clearly Better Polymer stamps from My Stamps
| Who is My Stamps | Who is Cathy Daulman |
| What is Privacy | What is Secure Shopping |
| Links & Things |
Copyright Information
Yes, you MAY sell cards which you have hand stamped
using My Stamps
My Stamps is an ‘Angel Company’. We recognize
and appreciate the part artists and crafters play in the evolution of stamping
as an art craft. We appreciate that their work gives our stamps life. We
consider work created and sold using Cathy’s designs not to be an infringement
of copyright providing the images used were each individually hand stamped
by the selling artist. Any reproduction or copy of Cathy's designs by any
other means, eg graphic, photographic including photocopying, electronic,
mechanical or otherwise without the express written permission of the Author
remains in conflict with the law.
Copyright 1992 - 2005 Cathy Daulman applies to all
graphic and written material herein unless credited otherwise
These
pages have been optimised for Itnernet Explorer v6+. Most effects etc will
operate under IE5 + but we do suggest that you upgrade to the latest version.
Internet Explorer
NOTE:
Pleaase ensure that your type size is set on medium or smaller (click <VIEW>
<TEXT SIZE> <MEDIUM> or <SMALLER>)

Supa-stampy-
fabulistic-in-my-
house-creations
Part
2
by Cathy Daulman
Shopping bag art
a zigzag pattern) and use this piece as your stamp. Ink it just as you would normally. It's also an inexpensive way of making instant stamps for kids to play with, and preserves your collection!
Milk & Vinegar
Did
you know that, before plastic was discovered, buttons were made out of
casein? Yep, casein from milk! Casein jewellery was often used to create
fake ivory, due to its colour. Make your own casein plastic this way.
Take a cup of low fat milk, bring it to the boil, and add 5 tablespoons
of vinegar. The milk will curdle, creating curds (the lumps) and whey
(liquid). Remove the curd and mix it thoroughly. It will seem very crumbly
but keep going. Push it into a mould, or place it onto some freezer paper
and stamp into it. Then set it aside to dry for a few days. As it dries
it will shrink considerably and become smooth.
The web-page http://www.wackyuses.corn/
madscientist.html will give you
more information. Adding baking soda and warm water to the curds makes
very good, old- fashioned gl4e. Powdered milk is often recommended but
I've found low fat milk just as good.
Toaster oven
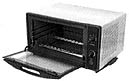
Toaster ovens were
very popular a few years ago, and their recent decline as a household
appliance has meant they can often be picked up inexpensively second hand
at garage sales - or even new. A toaster oven is ideal to bake polymer
clay in. First, however, ensure that you always use an oven thermometer
to
ensure that your toaster oven thermostat is correct.
Page
2
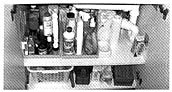
Under the Sink
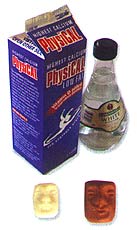
Pascoe's Long Life Self-
Shining Floor Polish
Pascoe's Long Life Self-Shining
Floor Polish gives polymer clay pieces a varnished look. After baking and
cooling polymer pieces, paint with two coats of the polish for a lovely
sheen. (When I was in New Zealand I used Johnson One and All.)
Create amazing background papers by placing tissue paper on baking parchment
or freezer film and paint with watered-down Pascoe's Long Life Self-Shining
Floor Polish mixed with Lumiere paint. (Floor polish can also be used on
acetate - see Virginia's article in Issue 30 of The Rubber Gazette
for more detail.)
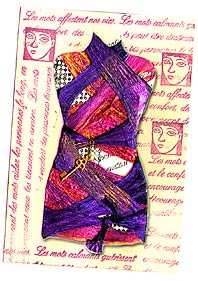
Shopping bags
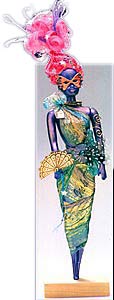
For fabulous distorted
collage embellishments, paint plastic shopping bags with Lumiere paint.
Allow to dry, and then heat with a heat gun. Try wrapping a cheap doll with
Lumiere- painted shopping bags, and then heat with a heat gun. Her new clothes
will shrivel to fit her snugly and beautifully! But please don't overheat
and melt the doll!
Make interesting beads by wrapping strips of Lumiere-painted shopping bag loosely around a wooden skewer or satay stick. Glue the end in place and heat and distort with a heat gun. Allow to cool. Remove the bead from the skewer, and string onto cord or elastic. Oooo La La!
In
the last issue of The Rubber Gazette, I began ransacking
the kitchen for common household products that you can use to enhance
and extend your stamping kit. In this second article, I co9tinue foraging
around the kitchen for more nifty alternative stamping supplies, and I
share some of the fabulous creations that can be produced with them.
In the Cupboard
Make yourself a cuppa
And while you're about it, you can create aged paper by randomly painting
cardstock or paper with a strong black tea or coffee solution. .Alternatively,
make the solution in a shallow tray, dunk the card stock or paper quickly
in the solution, and lay on paper towel to dry. Experiment with different
brands and strengths of tea and coffee. An effective look is to sprinkle
coffee grains here and there whilst the paper is still wet. Allow to dry
flat, then brush off remaInIng graIns.
Fridge Finds
Meat Trays
Foam meat trays totally misbehave when heated, but they look glorious
if first painted with Lumiere paint. The meat tray distorts, and as Lumiere
is a flexible paint, it distorts with it! It's super for brooches and
pins - wire the pieces together and decorate with beads.
Meat trays are often covered in a fine plastic film. To avoid fumes, remove this first. Another idea is to create a pattern or design in the meat tray with a ballpoint pen (this looks particularly effective in